A Guided Walk Through of OpenVPN
Before We Start
If the idea of accessing the devices under a protected private subnet has ever appeared in your mind, then OpenVPN maybe one of your choices. OpenVPN is a cross-platform software that allows you to build robust, flexible, and secure virtual private networking(VPN). Despite these renowned properties, building and configuring such a software is never an easy shoot, especially when you do it for the first time. So in this guide, I will walk you step by step through the entire process and finally build a private networking that allow you to access your devices in your home or company from every corner of the world!
The whole process is boring, I have to admit in the first place, but the final system will certainly outcome those frustration during the process. So please fasten your belt and we are going to take off.
First Equip Yourself with OpenWRT and A VPS
OpenWRT is a Linux operating system targeting embedded devices. You can just treat it as a super-power router that runs a Linux OS so it allows you to do almost anything that an usual Linux can do. We use it mainly to serve as the OpenVPN Client and the router that connects all the devices under it into the Internet. As opposed to the OpenVPN Client, there is a OpenVPN Server running on a remote VPS(Cloud Virtual Private Servers). Any server that has a public IP can server as the OpenVPN Server. In this tutorial, I will use the VPS server provided by aliyun running Ubuntu 16.04. I choose these just because I’m used to it, you can choose whatever cloud service provider with whatever Linux distribution that you are familiar with or prefer, it really doesn’t count.
Cloud Server Setup
Now let’s login to the cloud server that we have just brought for the first time(maybe via the web page or password). We must make some configurations there to make it a OpenVPN Server.
Basic Linux Cloud Server Security Setup (Optional)
Create a Non-Privileged User (Optional)
If the defalut user that the cloud provider gives you is a non-root user, you can just skip this section and use that user happily. If not, create a non-privileged user and grants it the sudo privilege.
# if you are root, run the 2 commands
$ adduser <username>
$ usermod -a -G sudo <username>
$ su <username>
Upload your ssh Public Key (Optional)
ssh is a command that allows you to take control of your remote server gracefully. I’m not trying to explain those fundamental concepts in this article. When you get confused of some term of command in the rest of this article, feel free to google it.
In short, just copy the contents of file ~/.ssh/id_rsa.pub in your local machine and append it into the file ~/.ssh/authorized_keys on your remote server, and then you can ssh to your server from your local machine without bothering to enter the password.
Strengthen your ssh (Optional)
Modify /etc/ssh/sshd_config and change the two settings PasswordAuthentication and PermitRootLogin from yes to no:
PasswordAuthentication no
PermitRootLogin no
Now only you, more specifically speaking, only this computer who owns the private key corresponding to the public key you have just uploaded can have legal access to login this cloud server as the user you have created(beside your cloud provider’s website).
Run sudo service sshd restart to enable this configuration to take place.
Install OpenVPN
Installation is just easy with apt under ubuntu, just give the command:
sudo apt update
sudo apt install openvpn
If it prompt you for choice, just choose the default choice. You can check that the OpenVPN is installed successfully by the following command.
$ openvpn --version
OpenVPN 2.4.4 x86_64-pc-linux-gnu [SSL (OpenSSL)] [LZO] [LZ4] [EPOLL] [PKCS11] [MH/PKTINFO] [AEAD] built on May 14 2019
library versions: OpenSSL 1.1.1  11 Sep 2018, LZO 2.08
Originally developed by James Yonan
Copyright (C) 2002-2017 OpenVPN Technologies, Inc. <sales@openvpn.net>

...[omitted]
Install easy-rsa
easy-rsa is just a small tool to generate the related certificates needed by OpenVPN.
sudo apt -y install easy-rsa
Build CA Certificates
Make a directory called easy-rsa under the folder /etc/openvpn and copy all the stuffs under the folder /usr/share/easy-rsa/ to the folder that we have just created.
sudo mkdir /etc/openvpn/easy-rsa/
sudo cp -r /usr/share/easy-rsa/* /etc/openvpn/easy-rsa/
cd /etc/openvpn/easy-rsa/
CA Certificate is a file shares between the server and the client and it only needs to be generated once for one server. Before we build the CA certificate, make sure you have changed to root by the command sudo su. The source vars command sets up the environment needed by the following ./build-ca command according to the contents in the file named vars.
sudo su
source vars
./clean-all
./build-ca
Now you are the root, which means you should be extremely careful when you type because this superuser can do anything to your server. If you saw the following warning after executing the command
source vars, you should add another command to make a soft link to that missing file. I have a file namedopenssl-1.0.0.cnfunder my folder so I just use this command:ln -s ./openssl-1.0.0.cnf openssl.cnf.
***********************************************
  No /etc/openvpn/easy-rsa/openssl.cnf file could be found
  Further invocations will fail
***********************************************
If you are not reading this part of article for the first time, you should be aware that the command ./clean-all is DANGEROUS. What this command do is simply removing all the files under the folder keys, which contains all the things you have generated since you installed easy-rsa. So be sure you know what you are doing before giving this command.
If the above commands finished successfully, you will find some new files generated in the folder keys. Copy the file ca.crt to the folder /etc/openvpn. We do this copy command simply because OpenVPN assumes that all the configuration files locates in the default folder /etc/openvpn. If you are skilled enough, it is not necessary since you can specify the configuration files in your .conf file(see section below).
cp /etc/openvpn/easy-rsa/keys/ca.crt /etc/openvpn
Build Server Certificate
Here I wrote aliyun as the first parameter, which totally depends on your preference. You can name it whatever you think is meaningful to you.
./build-key-server aliyun
Now more new stuffs appears in the keys folder. Copy aliyun.crt, aliyun.key to the folder /etc/openvpn.
cp keys/aliyun.key keys/aliyun.crt /etc/openvpn/
Build the Diffie-Hellman file and ta.key
Diffie-Hellman file and ta.key is used to strengthen the security of the network. There is no need to understand what they really are, so just copy and paste the following commands.
./build-dh
cp keys/dh2048.pem /etc/openvpn
openvpn --genkey --secret ta.key
cp ./ta.key /etc/openvpn
Build Client Certificates
As opposed to Server Certificates which are files stored in the remote server forever, Client Certificates are files generated on the remote server but used by the multiple end-users, which means they will be copy out from the server one day.
./build-key ainevsia
cp keys/ainevsia.key keys/ainevsia.crt /etc/openvpn/
Here ainevsia should also be DIYed by you.
How To Add a New Client
To add a new client just means building another client certificate. You can just run the above command twice the achieve that purpose. Caution that the server may prompt you to run source vars again. Do so but DO NOT RUN ./clean-all, that will remove all the files you already generated. just run source vars && ./build-key client-name will be safe. See the following example.
root@iZuf6dpjg5t8prvwa2ajodZ:/etc/openvpn/easy-rsa$ ./build-key openwrt
  Please edit the vars script to reflect your configuration,
  then source it with "source ./vars".
  Next, to start with a fresh PKI configuration and to delete any
  previous certificates and keys, run "./clean-all".
  Finally, you can run this tool (pkitool) to build certificates/keys.
root@iZuf6dpjg5t8prvwa2ajodZ:/etc/openvpn/easy-rsa# source vars && ./build-key openwrt
NOTE: If you run ./clean-all, I will be doing a rm -rf on /etc/openvpn/easy-rsa/keys
Generating a 2048 bit RSA private key
[...]
cp keys/openwrt.crt keys/openwrt.key /home/<username>
Here we already have built two clients: openwrt and ainevsia. They will all be used in the following sections.
If you have kept reading till this line, then congratulations, you have finished generating all the boring but essential crypto files that serve to secure our network. Now we will move on to configure the real OpenVPN.
Setup the Server’s OpenVPN
First of all, copy a sample config file from the official documents.
cp /usr/share/doc/openvpn/examples/sample-config-files/server.conf.gz /etc/openvpn/
cd /etc/openvpn
gzip -d server.conf.gz
Now change the essential entries according to your requests. Personally, I changed the port from the default 1194 to my customized port and select the proto tcp. I also uncommented the line client-to-client because all I want to do is just make connections between clients :D.
The lines that you should change are these lines:
proto tcp
port 1194
# change to your preferred port, 59318 in the article (just for example)

ca ca.crt

cert server.crt
# change to aliyun.crt

key server.key  # This file should be kept secret
# change to aliyun.key

log         /var/log/openvpn/openvpn.log
# uncomment this line (personal preference)

client-to-client

;explicit-exit-notify 1
Change the server.crt and server.key to the file names that you use. Additionally, if your configure files are not in the same folder of this server.conf file, write the absolute file path instead.
Modify Client’s OpenVPN Config File
Just like the above section, we change the client configuration files following the same guide line by the way.
cp /usr/share/doc/openvpn/examples/sample-config-files/client.conf /etc/openvpn/
proto tcp
remote <IP> 59318<Port>
ca ca.crt
cert ainevsia.crt
key ainevsia.key
Server Side Configuration Finished
Modifying the config file is really the most difficult part of this process. If you finish, you can finally launch the OpenVPN service.
cd /etc/openvpn
systemctl restart openvpn@server.service
If the above command cannot start the service, try # openvpn --config /etc/openvpn/server.conf &.
Here is a demo of how a success launch may look like. If your port number doesn’t show up in the netstat -tunlp command, that means the OpenVPN service does not start successfully.
root@iZuf6dpjg5t8prvwa2ajodZ:/etc/openvpn# openvpn --config /etc/openvpn/server.conf &
[1] 8560
root@iZuf6dpjg5t8prvwa2ajodZ:/etc/openvpn# netstat -tunlp | grep 59318
tcp        0      0 0.0.0.0:59318           0.0.0.0:*               LISTEN      8560/openvpn
Final Working Directory
Here’s a look from my cloud server when I started the OpenVPN service.
$ tree /etc/openvpn/ -L 1
/etc/openvpn/
├── aliyun.crt
├── aliyun.key
├── ca.crt
├── client.conf
├── dh2048.pem
├── easy-rsa
├── ipp.txt
├── ainevsia.crt
├── ainevsia.key
├── openvpn.log
├── openvpn-status.log
├── server.conf
├── ta.key
└── update-resolv-conf
The OpenVPN Server needs the file server.conf to start up normally. The files ca.crt client.conf ainevsia.crt ainevsia.key ta.key dh2048.pem will all be needed by the client, so we are going to download these file next from our cloud server to the local computer, which is the client.
Get the Client Config File
You can use the sftp command.
Copy the file to the home directory and then change the privilege. Then you can use sftp to get your files.
sudo cp ca.crt ainevsia.crt ainevsia.key ta.key client.conf ~/
cd
sudo chmod o+r ainevsia.key ta.key
If you are on Windows, change the file client.conf to ainevsia.ovpn.
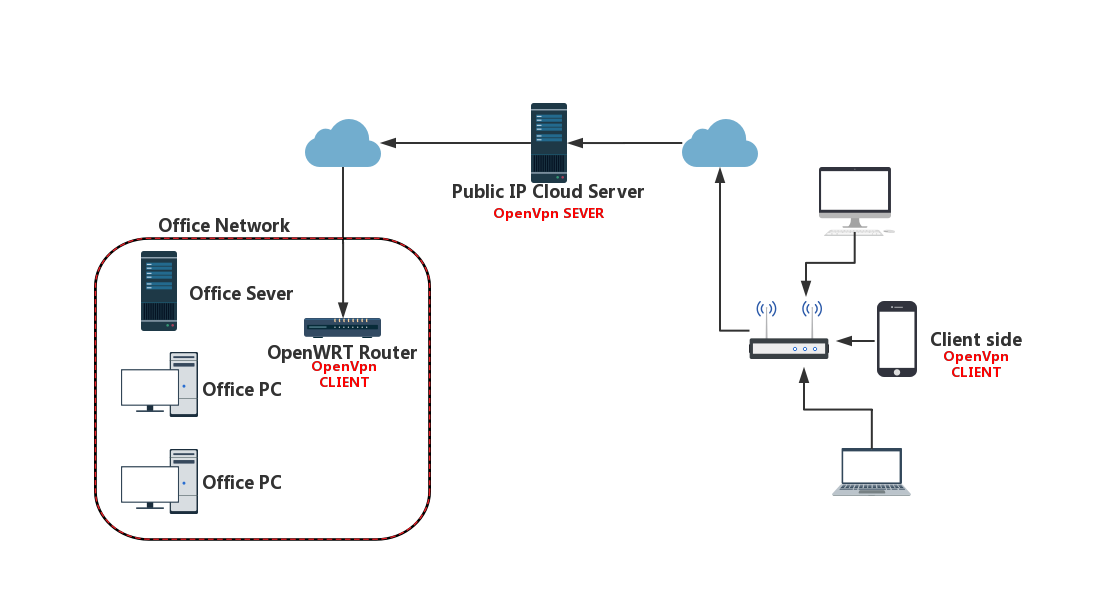
The Big Picture
Before we move on to the OpenWRT section, you can checkout the following image to make sure that we are on the right track.
OpenWRT from Scratch
Basic Connection
To make demonstrations, I reset my OpenWRT router so I can make configures from scratch. Here is the official documents.
This router enables wireless connections by default, so we can connect to it via Wi-Fi. Otherwise, you have to get a network cable between your local computer and your router.
There is no password required before I successfully connected to its Wi-Fi and the default gateway is 192.168.1.1, which I will change to 192.168.10.1 because my upper router also has IP 192.168.1.1 which may harm the successful network connection of my OpenWRT router. The first thing to do after connection is to set a password for the Wi-Fi.
Before proceeding, make sure that you have plugged in the network cable in the WAN port of the router so that it can surf the Internet because we need Internet connection while downloading packages. Then all the commands are carried out during ssh. Here is the OpenWRT version and the Linux kernel version.
BusyBox v1.29.2 () built-in shell (ash)

  _______                     ________        __
 |       |.-----.-----.-----.|  |  |  |.----.|  |_
 |   -   ||  _  |  -__|     ||  |  |  ||   _||   _|
 |_______||   __|_____|__|__||________||__|  |____|
          |__| W I R E L E S S   F R E E D O M
 -----------------------------------------------------
 OpenWrt 18.06.1, r1026-811894e1
 -----------------------------------------------------
root@OpenWrt:~# uname -a
Linux OpenWrt 4.9.138 #0 Fri Nov 30 14:52:43 2018 mips GNU/Linux
Install OpenVPN
opkg is the OpenWRT’s splendid package manager, just like apt and apt-get in Linux. However, the default source in the file distfeeds.conf is blocked in China mainland, so change the sourse to USTC open source software mirror. Then update will be fast and happy.
root@OpenWrt:~# cd /etc/opkg/
root@OpenWrt:/etc/opkg# ls
customfeeds.conf  distfeeds.conf    keys
root@OpenWrt:/etc/opkg# cp distfeeds.conf distfeeds.conf.bkup # backup before any operations
root@OpenWrt:/etc/opkg# sed -i "s/openwrt.proxy.ustclug.org/mirrors.ustc.edu.cn\/lede/" /etc/opkg/distfeeds.conf
root@OpenWrt:/etc/opkg# opkg update
root@OpenWrt:/etc/opkg#opkg install openvpn-openssl
Upload Configuration Files
Now we need to upload our configuration files onto the OpenWRT router, which requires the sftp service which need installation.
root@OpenWrt:/etc/opkg# opkg install openssh-sftp-server
Configuring the client is just the same as the server. The core file here is the client.ovpn.
root@OpenWrt:/etc/openvpn# openvpn client.ovpn
Fri Sep 27 13:09:43 2019 OpenVPN 2.4.5 mips-openwrt-linux-gnu [SSL (OpenSSL)] [LZO] [LZ4] [EPOLL] [MH/PKTINFO] [AEAD][nonblock]

[.. omitted]

Fri Sep 27 13:09:46 2019 Initialization Sequence Completed
If you see the last line Initialization Sequence Completed, then well done. You almost finished all the steps and the network is nearly set up.
Start on Boot
Now we are going to make this OpenVPN service start automatically each time it boots up, since the OpenWRT is not like the cloud server, it may reboot for any unexpected reason. Luckily, OpenWRT provides a uniformed configuration interface called UCI. It is simple and robust to use the UCI to make configurations to achieve the desired service. The only thing to do is to modify the /etc/config/openvpn file.
package openvpn

#################################################
# Sample to include a custom config file.       #
#################################################

config openvpn custom_config

        # Set to 1 to enable this instance:
        option enabled 1

        # Include OpenVPN configuration
        option config /etc/openvpn/client.conf
Now you can test your OpenVPN connection by launching a new terminal and run logread -f command, which is used to track system logs, before the /etc/init.d/openvpn restart command.
The following two command makes the OpenVPN service starts on boot.
/etc/init.d/openvpn enable
/etc/init.d/openvpn restart
Finally, you should use the command reboot to gently stop and restart the router instead of powering it off. If successful, it will automatically connects to the server.
If not, /etc/init.d/firewall restart.
Optional Settings
Give the OpenWRT a Fixed IP
This part involves the operations on the server.conf file on the remote server. Take a look at its comments:
# EXAMPLE: Suppose you want to give
# Thelonious a fixed VPN IP address of 10.9.0.1.
# First uncomment out these lines:
client-config-dir ccd
route 10.8.0.101 255.255.255.0
# Then add this line to ccd/Thelonious:
#   ifconfig-push 10.9.0.1 10.9.0.2
So do what it says and create the folder and the file, write ifconfig-push 10.8.0.101 10.8.0.102 into the file openwrt by the following command:
mkdir /etc/openvpn/ccd
echo ifconfig-push 10.8.0.101 10.8.0.102 > /etc/openvpn/ccd/openwrt
Now restart the service and it will take effect.
Add A HTTP-Proxy to Allow Foreign Connection
Squidis a full-featured web proxy cache server application which provides proxy and cache services for Hyper Text Transport Protocol (HTTP), File Transfer Protocol (FTP), and other popular network protocols.
On your remote cloud server, install squid and htpassws, which is used for passowrd authentication.
sudo apt install squid aainevsiahe2-utils
Squid is configured by editing the directives contained within the
/etc/squid/squid.confconfiguration file. Prior to editing the configuration file, you should make a copy of the original file and protect it from writing so you will have the original settings as a reference, and to re-use as necessary. Make this copy and protect it from writing using the following commands:
sudo cp /etc/squid/squid.conf /etc/squid/squid.conf.original  # make copy
sudo chmod a-w /etc/squid/squid.conf.original # protect from anyone changing it
To set your Squid server to listen on TCP port 39458 instead of the default TCP port 3128, change the http_port directive as such:
http_port 39458
Squid allows password authentication, which depends on htpasswd to generate the password file. To enable basic_ncsa_auth (config file locates on /usr/lib/squid/basic_ncsa_auth), do the following:
- Add the content to the config file
/etc/squid/squid.conf[TAG: auth_param].
  auth_param basic program /usr/lib/squid/basic_ncsa_auth /etc/squid/passwd
  acl auth_user proxy_auth REQUIRED
  http_access allow auth_user
- Use
htpasswdto generate thepasswdfile and the user. It will prompt you to enter the password twice.
htpasswd -c /etc/squid/passwd ainevsia # ainevsia is the proxy_username which can be changed accordingly
The above command generates the file /etc/squid/passwd. Now you can restart your squid server to apply this change by the command systemctl restart squid.
Small Change on the Local client.ovpn file
To enable the http-proxy service you have just configured on the remote server, you just need tiny modification on your local configuration file. Uncomment these two lines and modify the corresponding parameters in the brackets. Make your password.txt file and write the username on the first line while the password on the second line.
http-proxy-retry # retry on connection failures
http-proxy [ip address] [squid port] [password.txt]
Finally, I append my local configuration file here for your reference:
$ tree ./
./
├── ca.crt
├── client.ovpn
├── dh2048.pem
├── ainevsia.crt
├── ainevsia.key
├── password.txt
└── ta.key

0 directories, 7 files
If you encounters any problems, check out the default log file of
squidwhich locates at/var/log/squid/access.log.
Success
Now here you go.
Believe it or not, we now have finished setting up a working virtual private network totally from scratch. I hope you think this really deserves the all the efforts you have spent.
I want to cut off this ariticle right now, althought it has already been too long than I have expected. There certianly will be various different unexpected problems when you try it yourself but believe that all those technical problem can be tackled down. There is simply just no magic.
Best wishes to all of you in this last line.